Help
- Adding new users
- Creating classes
- Assigning time time per product
- Purchasing time time per product
- Statistics
- Reports
Entering new users
To enter a user in your school system, please take the following steps:Firstly, if you are not logged in, you have to log in to your account using the Log in form on the upper right part of the page.
In case you don’t have an account, use the REGISTER link to create one.
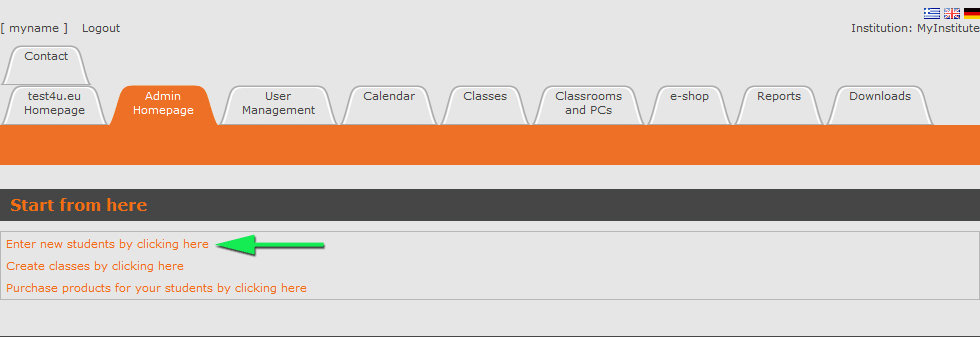
Then select the Enter new students by clicking here as displayed in the following image.
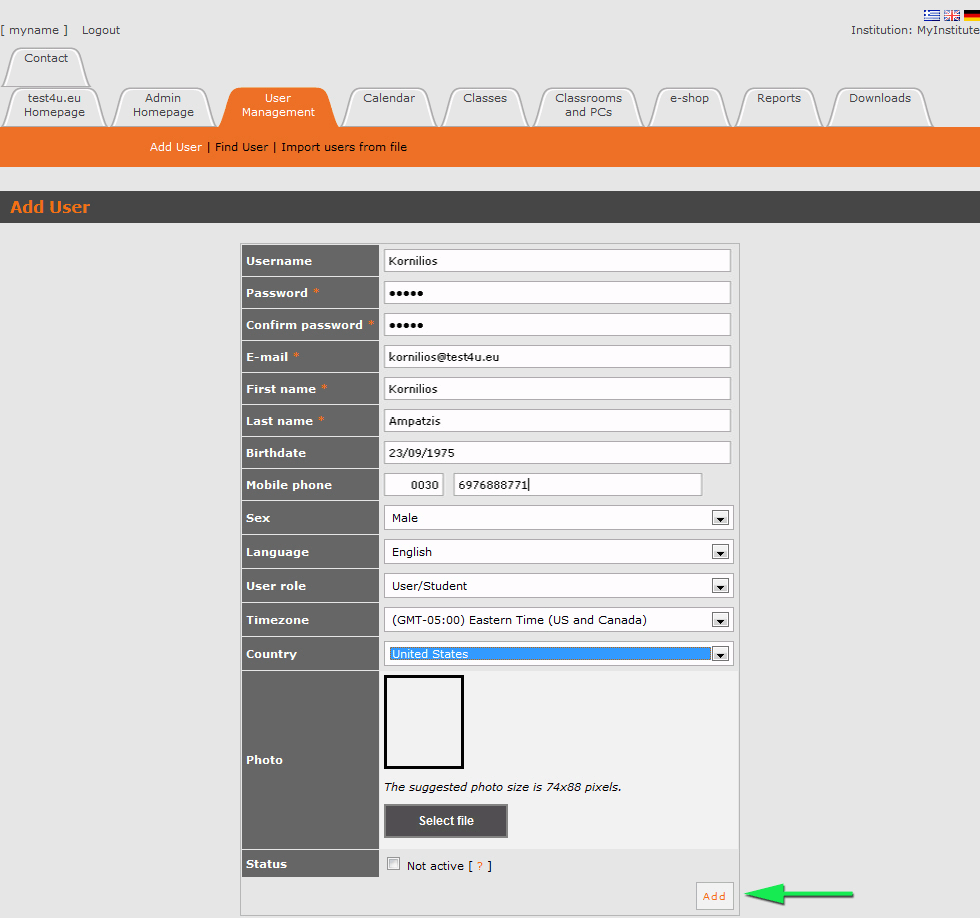
For Password enter the user’s password and while entering it make sure that the Caps Lock key and the keyboard language are properly set.
Confirm the password in the next field and again make sure that the Caps Lock key and the keyboard language are properly set.
Then enter the user’s E-mail Address, First Name and Last Name in the respective following fields.
Please note that the Password, Email Address, Name and Surname fields are required, that’s why they are marked with an asterisk. All of these fields must be filled in for a user account to be created.
Enter the user’s Birthdateand his/her Mobile Phone number in the respective fields.
Make sure the country code you have provided on your institution registration in the test4u.eu system is properly entered in the first telephone number field.
Mobile phone numbers may be used for automatic bulk SMS informing students about new classes, for advertisements, birthday or name day wishes or other important information.
For Sex, select Male or Female.For Language, select the language in which the user administration pages will be published.
The list of user roles will be described further down. The student’s role is the one examined on the example of the image.
For Time Zone and Country, select the appropriate data according to the place of residence of the student. You may use any image size to upload a student’s Photo, although the 74×88 pixel size is the most preferable one.
If you select the Select File button using the left mouse button, a navigation pane will open on your screen, so as to choose the desirable image file from your computer.
The Not active checkbox can be used to declare that a user is not active during this period or that he/she has stopped attending classes in your educational institution.
To save all this information, make sure you press the Add button on the lower right part of the form (see the green arrow on the previous image).
User roles
There is a dropdown list named User role…
- User/Student: This role is to be attributed to students. When they are logged in their administration panel, they have the right to see only their personal statistics, the time assigned to them per product and the rest of the available time.
- Secretary: This role has been created for the employees of your institution, who handle organizational and administrative issues. They can have a general idea of the users and of the time purchased by your institution. They are able to create and remove students, instructors and class data. Secretaries can access all of the reports and general statistics of your institutions but they CANNOT purchase anything, e.g. practice time, SMS Module.
- Teacher: This role is to be assigned to the teachers of your institution. They will be able to create or remove classes and student accounts and to see the class data and statistics of classes in which they participate. They will be able to monitor the progress of their classes only.
- Administrator: The administrator can access all of the options in the Administration Panel. He/she is the only who can assign roles, proceed in purchasing products (e.g. SMS) and activate Modules for specific users such as secretarial assistants or instructors.
So if your institution wishes to send SMS for Merry Christmas to students, it is the administrator who will purchase SMS and then activate the SMS module for a certain user. Keep in mind that this user can be assigned either the role of the Secretary or of the Teacher. This specific user will then be able to send SMS to students.
Creating classes
Creating a class tab is of great significance for the administrative and educational work. This tab provides the educational personnel with access to certain statistics picturing student’s progress. In this way it supports the educational work so as to become more fruitful.To create a class you should follow the next steps:
First of all, you have to be logged in your account. If you are not, use the Log in form on the upper right part of the page to log in.
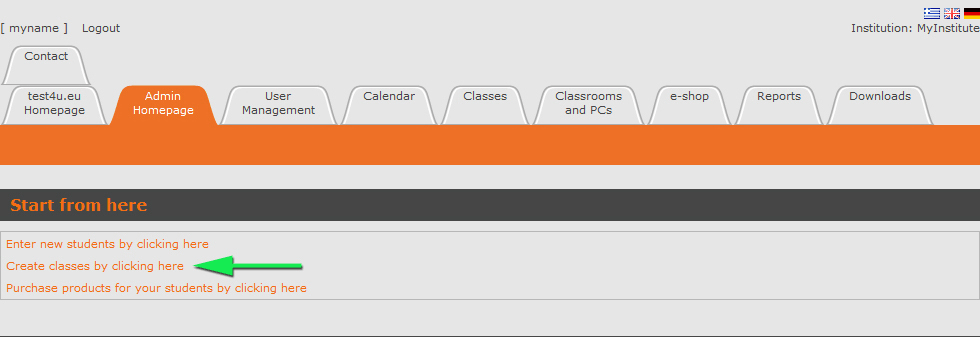
Then select the Create classes by clicking here link from the administration home page as displayed in the following image.
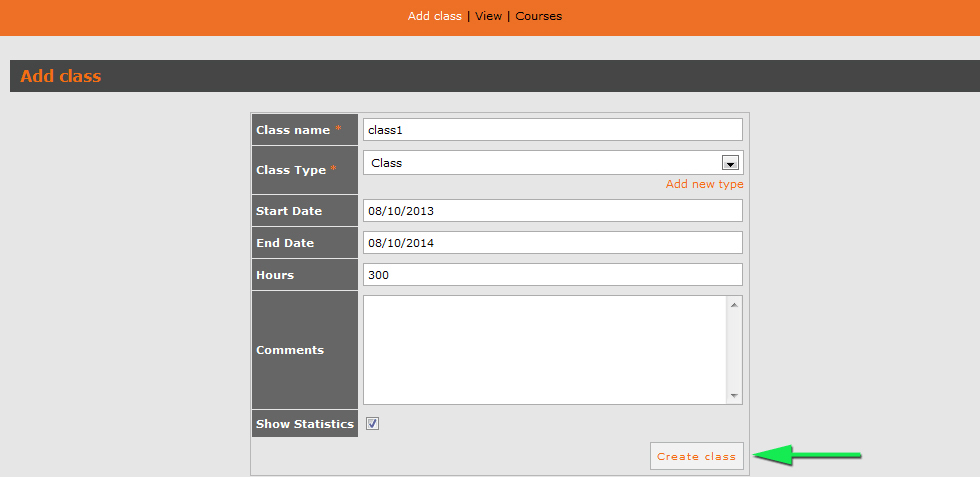
Our system provides with several Types of classes (e.g. private tuitions, seminars etc.) which can be used to better organize the services offered by your Institution.
Then select the Start Date and End Date of your class and fill in the number of hours of instruction required for it.Use the Comments field to note down any observations regarding your class.
Click in the Show Statistics box, if you want your students to be able to see their class statistics.
If you do so, the following image will be displayed on students’ screens during the TEST4U practice tests.
All you have to do to save your new class is clicking the Create class button.
Adding Teachers in a class
In the class administration tab, we click on the Teachers link.A list of all the class teacher will appear. By clicking on the Add teacher link we can add teacher to the class.
A window will appear with 2 combo boxes. On the first one we choose the teacher (from our school’s list of teachers) and on the second we choose the course this teacher will be assigned to.
The teachers can login using their credentials and edit the class, add or remove students to it and see the class’ student statistics.
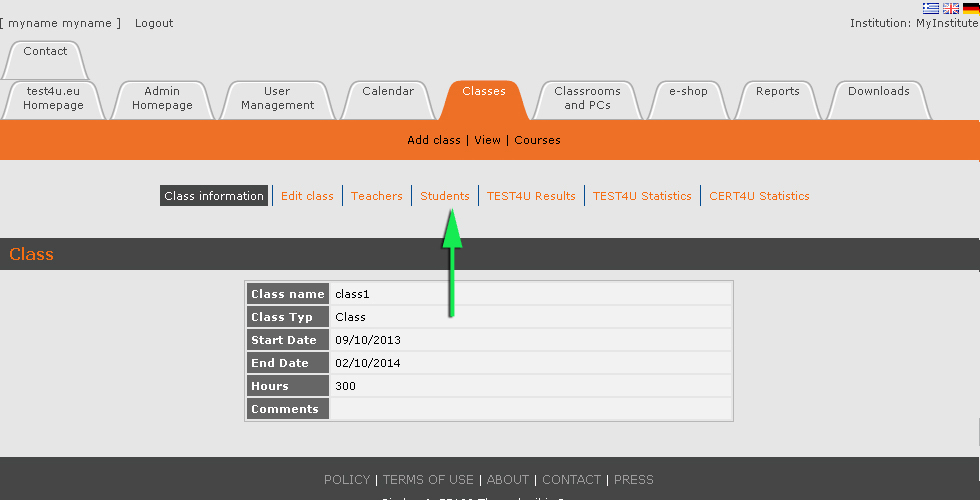
The next step is to add students’ data in the class.
Adding students in a class
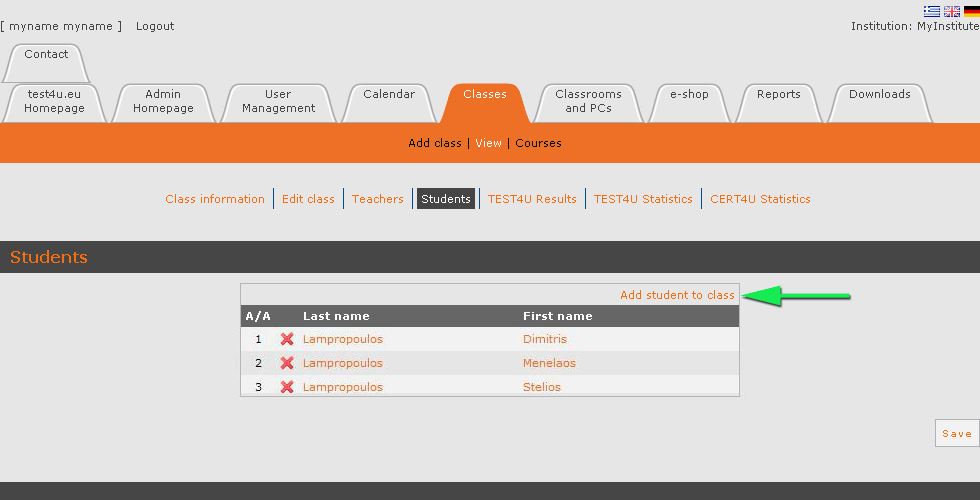
As soon as you have created a class, the class administration tab will open on your screen displaying the list of students in this class. Apparently, the students table will be empty, since we have just created this class.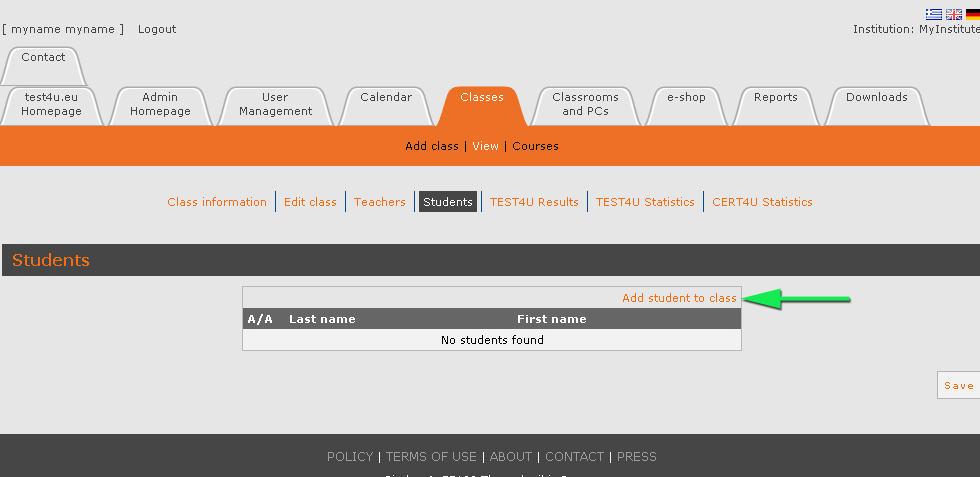
A list of all students in your school will then be displayed.

 button on the left of the student name to add him/her in the class.
 Otherwise, you may enter a part of the student’s name in the text frame above the list and click the magnifier  to display him/her. This option facilitates student selection particularly when there are lots of students in your institution.
Every student name added to a class is automatically removed from the list. to display him/her. This option facilitates student selection particularly when there are lots of students in your institution.
As soon as you finish with student selection, click OK (see the green arrow on the image above).
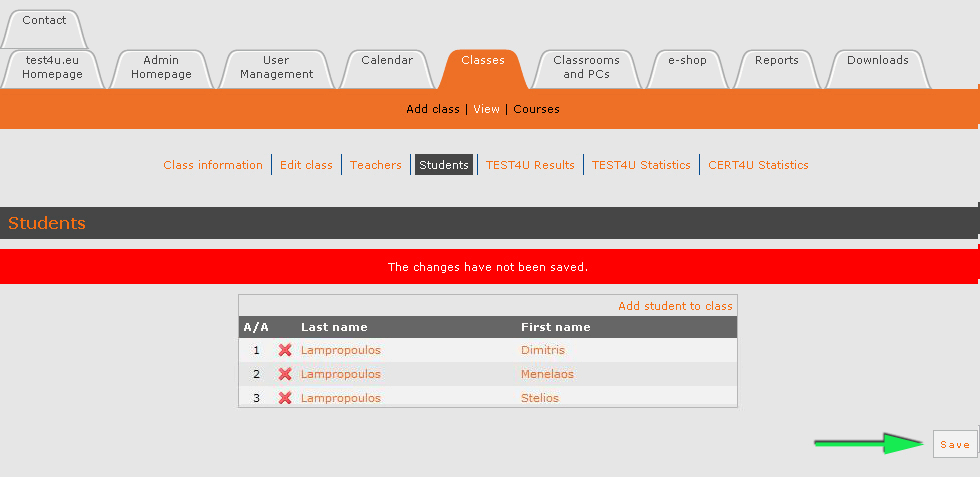
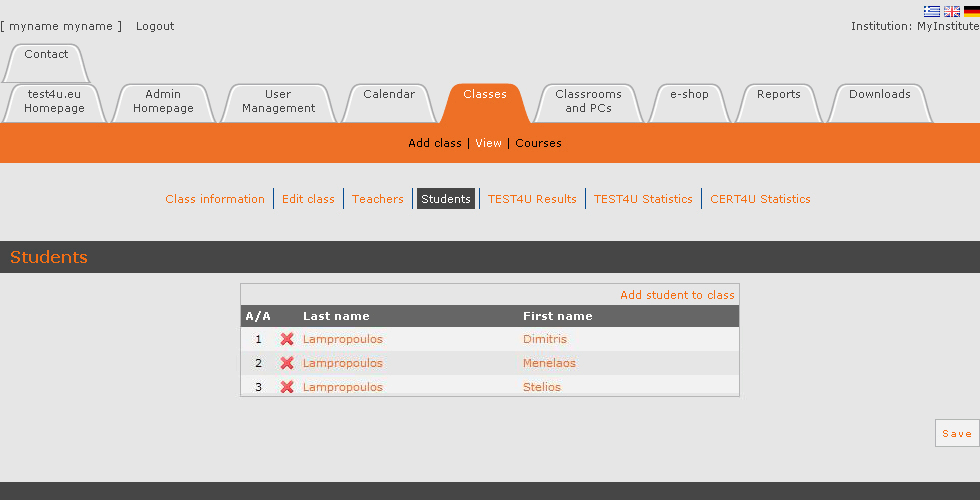
The system will take you back to the list of students on the class administration tab, where as you may observe, the students table displays now the selected student names.
Attention!!! The process of adding students in this class has not been completed yet. You have to click the Save button first to complete the process (see the green arrow on the following image).
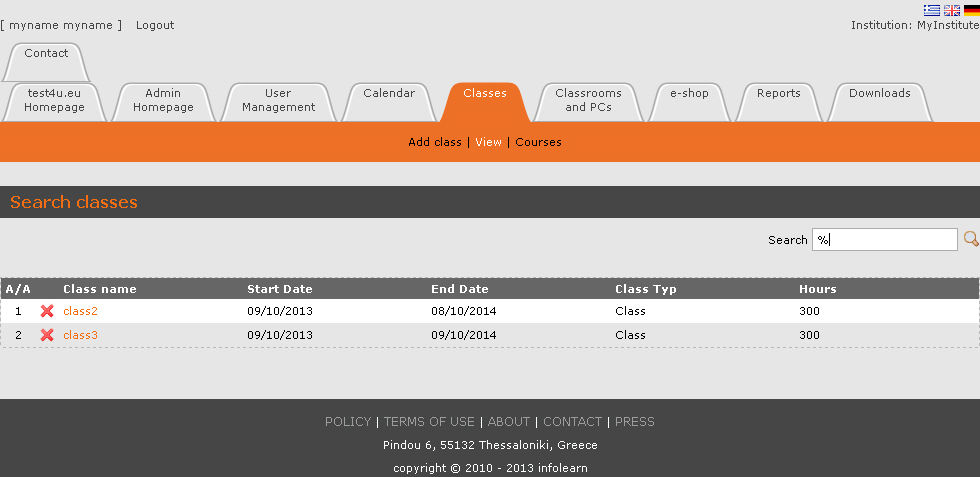
Select the Classes tab from the administration home page which will navigate you to a list of your classes. Then select the class you want to add students to (see the following image).
You may remove a student clicking the
 button on the left of the name in the Students option of the Classes tab.
 Assigning practice time per product
You should firstly assign educational time per product to the students of your institution before they are able to use TEST4U.For example, before a student can practice on Microsoft Windows German version, you have to assign him practice time for the Microsoft Windows – (DE) product.
In case there is not any time available for your institution, you will have to purchase it.
Then to assign your students practice time for a certain product, follow the next steps:
In case you are not logged in, log in to your account using the Log in form on the upper right part of the page.
Select the Classes tab to display the list of classes of your institution and then select the class you are interested in.
You may also reach this step of the process by selecting the User Management tab from the administration home page and then select the student of your choice. However, even if this way seems easier, the more populous your institution gets, the more time-consuming it may grow particularly when you cannot be sure of the class in which the student belongs to.
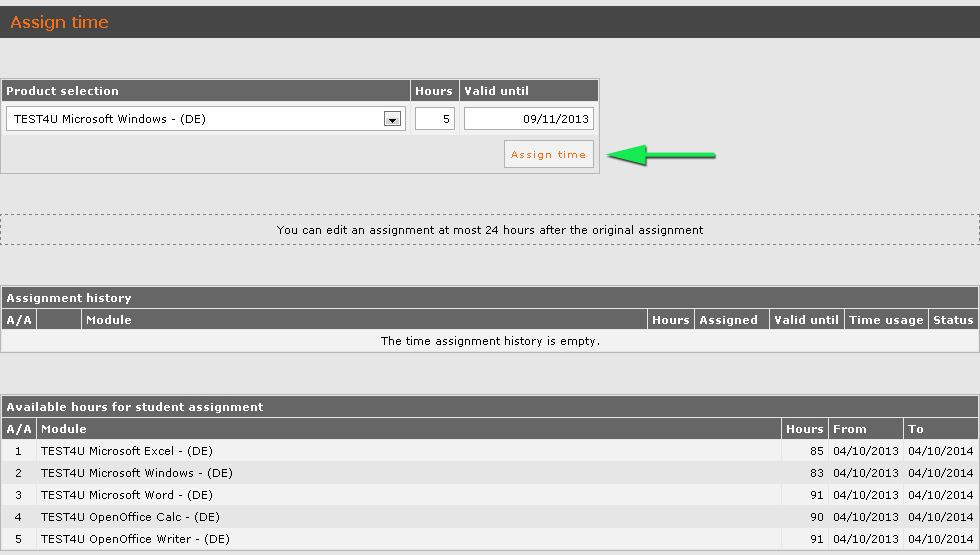
The following form (image) will then be displayed on your screen:
Locate the Product Selection list and select the unit which the selected student needs time to practice on.
Enter the number of hours to be assigned to the student for the specific product in the Hours box.
Then enter the date up to which these hours will be available for the student in the Valid until box. Finally, click the Assign time button to assign practice time to the student.
As you may see on the following image, you have assigned 5 hours on the TEST4U Microsoft Windows – (DE) product to the student, which will be available to him until 09/11/2013.
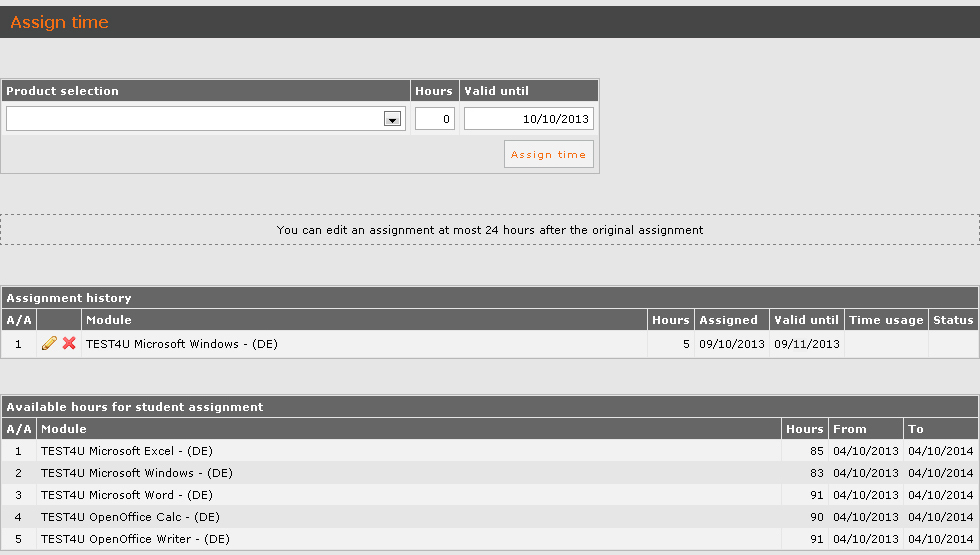
Keep in mind that you may edit an assignment at least 24 hours after the initial one. Henceforward there will be no possibility of editing.
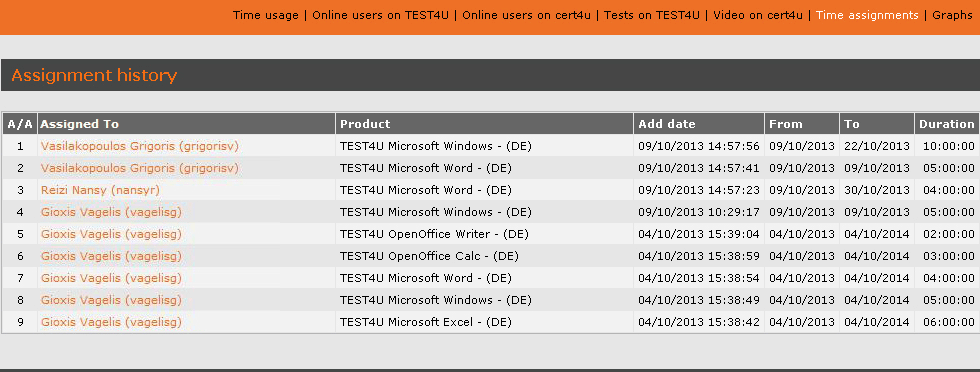
The new assignment as well as all the previous ones will then be displayed under the time assignment form on the Assignment history table.
The next image displays one more example:

The next one though shows that even if 11 hours have been assigned to the student, he/she has spent just 1:28:03, thus losing about 9,5 hours.
Purchasing time per product
TEST4U is based on allocating time per product to students.Therefore, an institution has to ensure there is enough practice time on its account to be distributed to students.
For example, to be able to assign 5 hours to student A, so that he can practice on the Microsoft Word 2013, the school must have purchased at least 5 hours for the specific product.
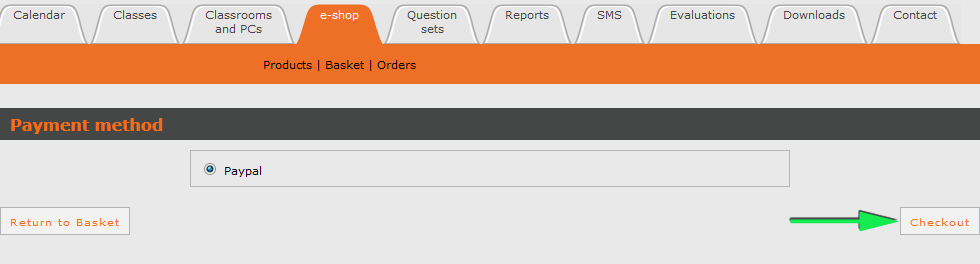
To purchase practice time, please follow the next steps:
In case you are not logged in, log in to your account clicking the Log in form on the upper right part of the page.
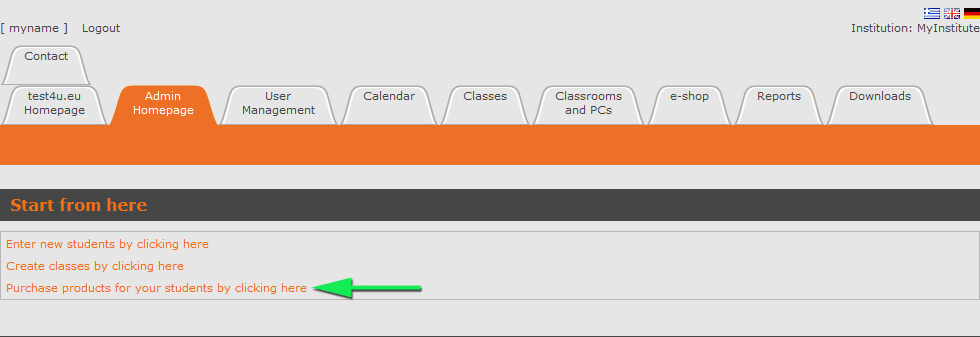
Then, open the administration home page and click the link named Purchase products for your students by clicking here, as displayed on the following image (see the green arrow).
The products available will then be displayed. Select the product you are interested in.
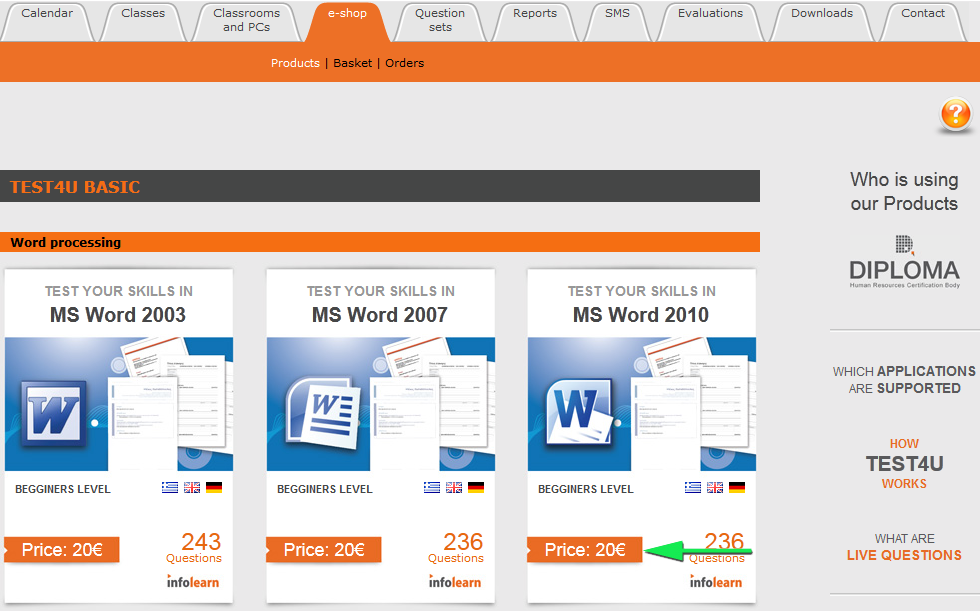
For example, we may select MS Word 2010 by clicking the price box. (See the green arrow on the following image).
It is worth noting that all of the products are available in different languages. Each language corresponds to a different product. So if you want to purchase time for the Microsoft Word 2010 Greek and English versions, you will have to purchase time for both of the products. Therefore you cannot purchase practice time for the Greek version and also use it for the English one.
Then the product is added to the basket.
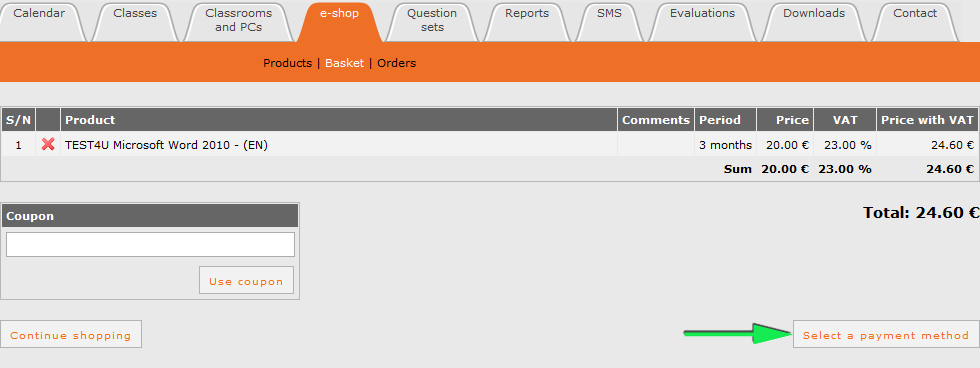
If you want to buy more products, click the Continue shopping button, select the products of your choice and then validate your purchase.
If you have a discount Coupon, FIRSTLY you will have to enter it in the Coupon field, click the Use coupon button and THEN click the Continue button.
Statistics
Statistics are probably the most important tool for an instructor to be able to follow up his/her students’ progress. TEST4U provides you with a plethora of statistics. Some of them will be described further down.Student statistics
Every time a student practices on TEST4U, TEST4U records the subcategories he/she has worked on (e.g. Tables on Word), the time spent on them and his/her performance. So, educational supervisors, instructors, the student as well as his/her parents can inform themselves about his/her progress.To consult a student statistics, please follow the next steps:
In case you are not logged in, log in to your account using the Log in form on the upper right part of the page.
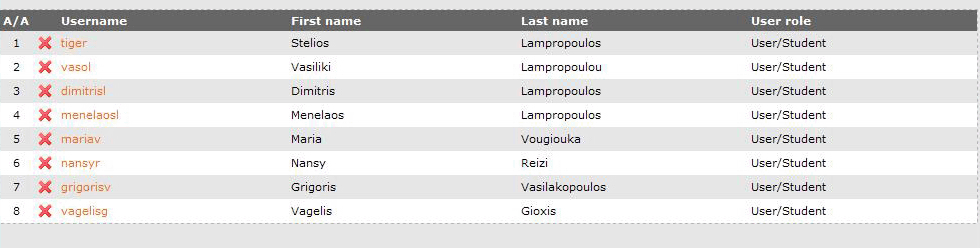
Then select the User management tab from the administration home page.
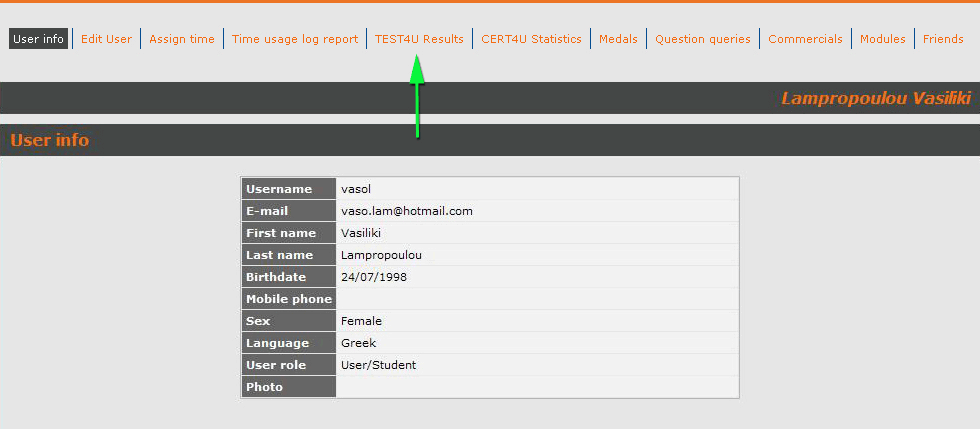
A list of all users in your institution will be displayed on your screen. Click the name of the student whose statistics you want to see.
If you select the TEST4U Results link, you will be able to see all of the results regarding this student.
As you may see, for example,
on the seventh line of the table on the next image
the student has completed a test on the Basic product
on the Libre Office software,
on the Writer unit,
on the TEST4U Certification Body and
on the Copy-Paste subcategory.
His/her score was 85.71% and he completed the test in 2 minutes and 43 seconds, on 09/07/2013, at 17:09.
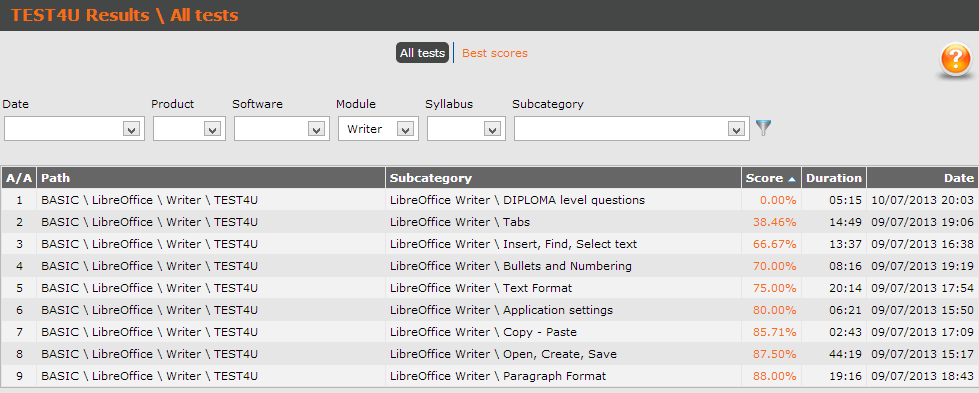
In addition, you have the option of filtering the results by selecting a specific date, product, software, unit, certification body or subcategory. All you have to do is selecting options from the respective lists displayed just above the results table and click the filter button.
You may also display All tests or the ones presenting the Best Scores.

You may also display All tests or the ones presenting the Best Scores.
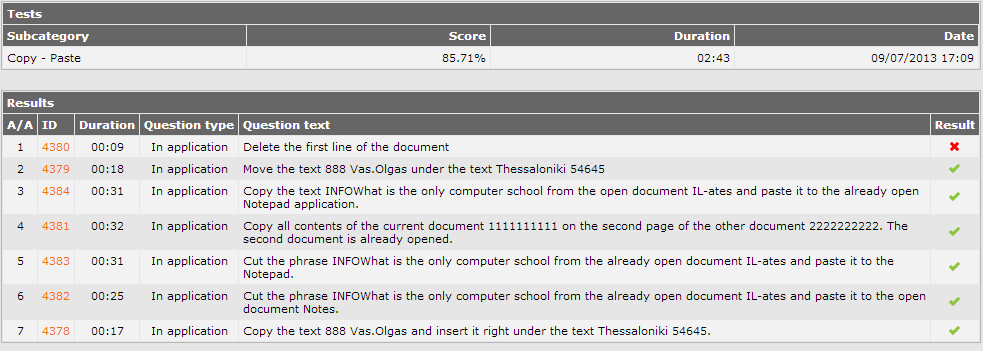
You may use all these information to reach some useful conclusions: categories chosen by the student to practice on, scores, time spent to complete an exercise etc. Furthermore, you may conclude that this student has difficulties with the Tabs subcategory, since his/her score is only 38.46% as well as with the Copy-Paste subcategory, on which he/she has scored 85.71%. If you click on his/her score, the system will display the following image, where we may see the exact questions he/she has answered incorrectly.
Class statistics
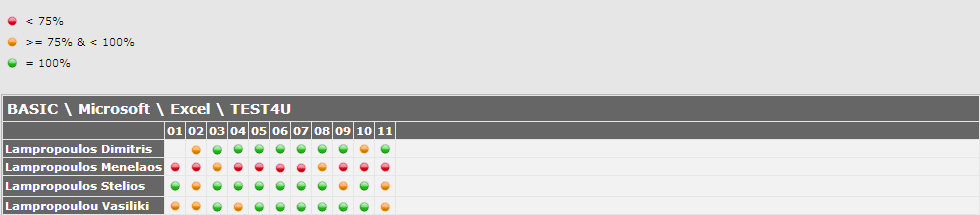
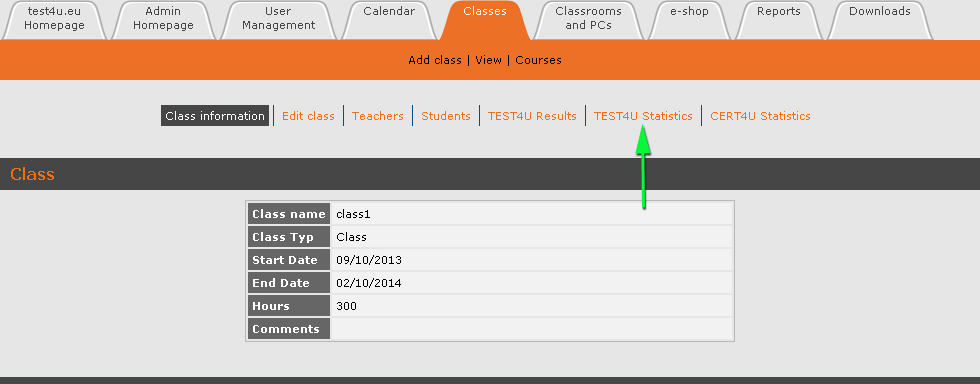
Furthermore, there are several statistics per class in you disposal, which may present a particular interest. Select the Class tab from the Administration Home page.A list of classes is then displayed for you to select the class you are interested in.
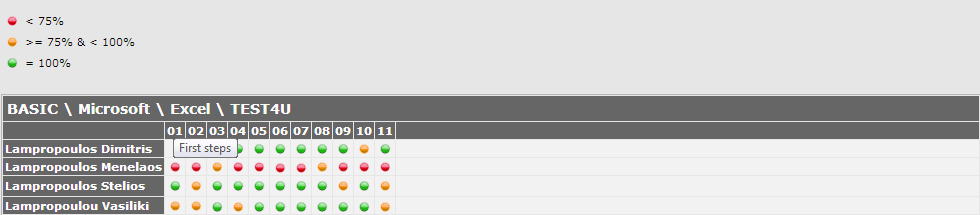
This table illustrates every student’s progress. As you may observe Lampropoulos Dimitris, Lampropoulos Stelios and Lampropoulou Vasiliki are doing quite well. They have run many tests with 100% success (green bullet) very few with more than 75% (orange bullet) while none of their scores is under 75% (red bullet). It’s worth noting though that Lampropoulos Dimitris has not completed the first test yet.
Lampropoulos Menelaos, on the other hand, does not do very well. He hasn’t scored 100% on any of the tests he has taken and only 2 of them are orange (>75%). The rest of his scores are red (<75%).
Lampropoulos Menelaos, on the other hand, does not do very well. He hasn’t scored 100% on any of the tests he has taken and only 2 of them are orange (>75%). The rest of his scores are red (<75%).
The numbers (01, 02, 03, 04 etc.) appearing on the table correspond to subcategories (Copy-Paste, Tables etc.). If you place the mouse pointer on them, a subcategory description will be displayed on a popup window. The following image displays the description of First steps subcategory appearing right after hovering the mouse pointer on number one (01).
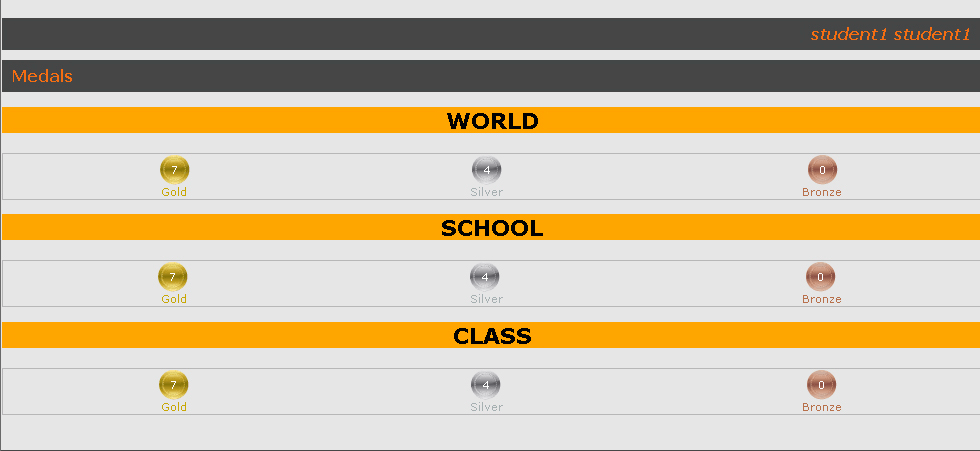
Medals
Medals are given to a student when he/she has managed to complete a test succeeding the best subcategory score and time in a class or in a school or among all students in the world who have taken the same test.To see a student’s medals, please follow the next steps:
In case you are not logged in, log in to your account using the Log in form on the upper right part of the page.
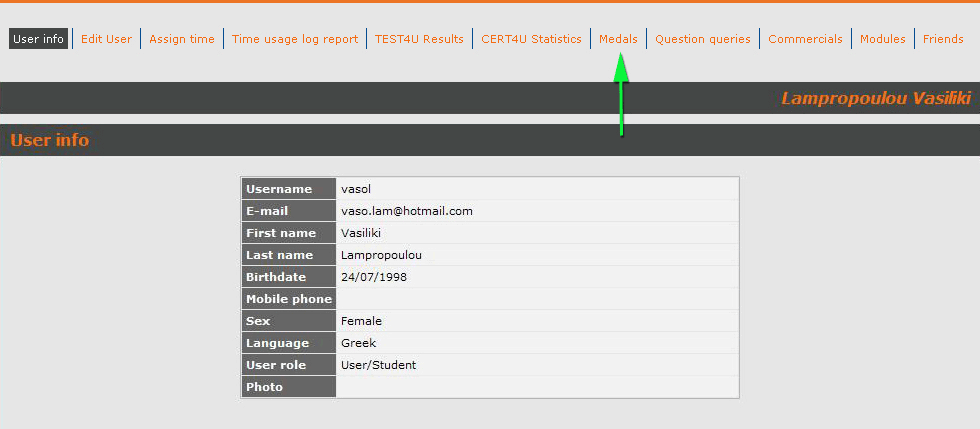
Then select the User management tab from the administration home page.
A list of all users in your institution will be displayed on your screen. Select the user you are interested in.
- Medals that the student has won for worldwide distinctions on TEST4U (among all students who have taken TEST4U tests) appear on the first line.
- Medals that the student has won for distinctions on TEST4U in his/her School appear on the second line.
- Medals that the student has won for distinctions on TEST4U in his/her Class appear on the third line.
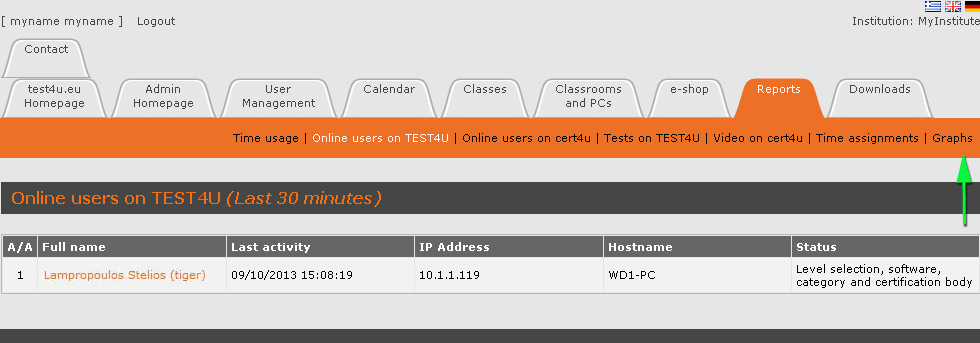
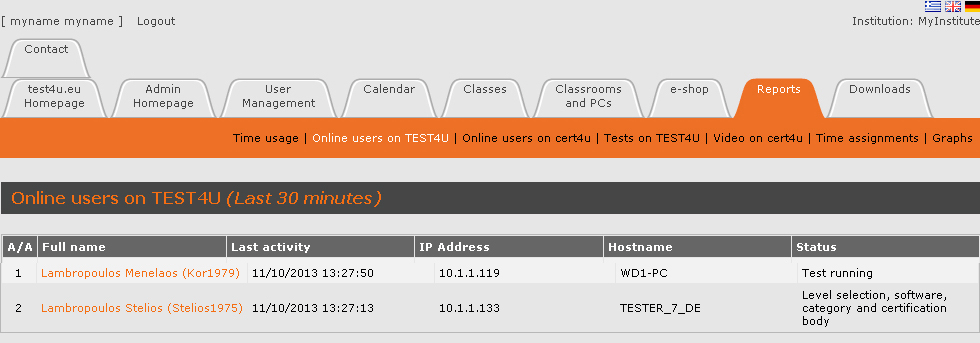
Reports
Reports provide you with administration information that is essential for your institution. You can use them to see the students who are logged in, the time consumed per unit by each student, the total of tests that have been run in your school as well as several interesting charts.To be able to consult the TEST4U reports, please follow the next steps:
In case you are not logged in, log in to your account using the Log in form on the upper right part of the page.
Then select the Reports tab from the Administration home page.
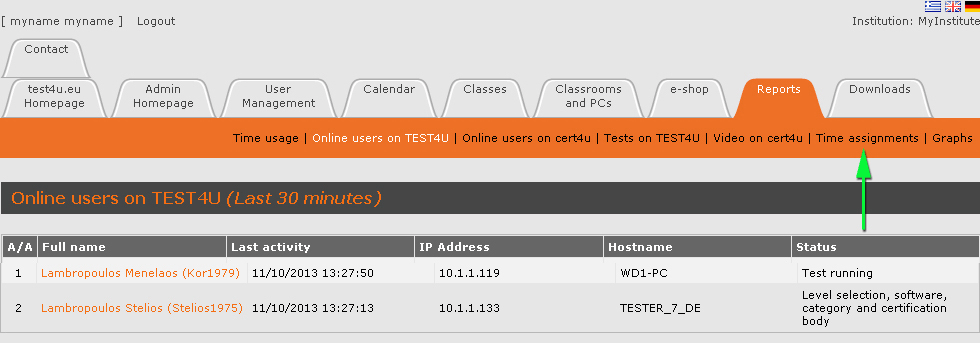
A list of your school users who are currently logged in will be displayed on your screen. They are students who are currently running TEST4U.
If you select the Time usage link (see the green arrow on the following image)…
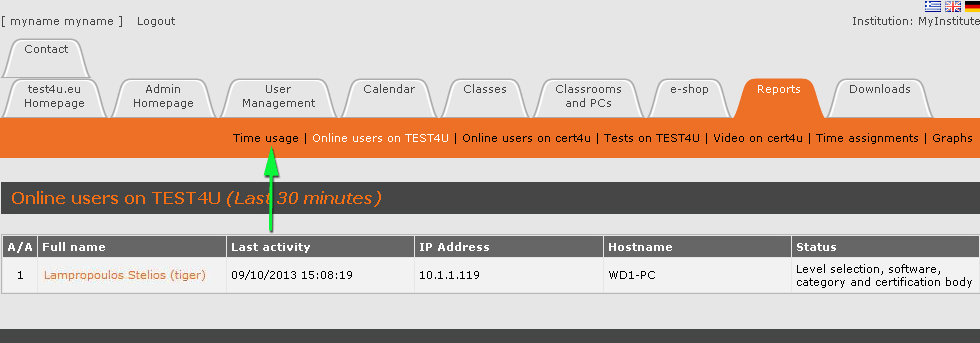
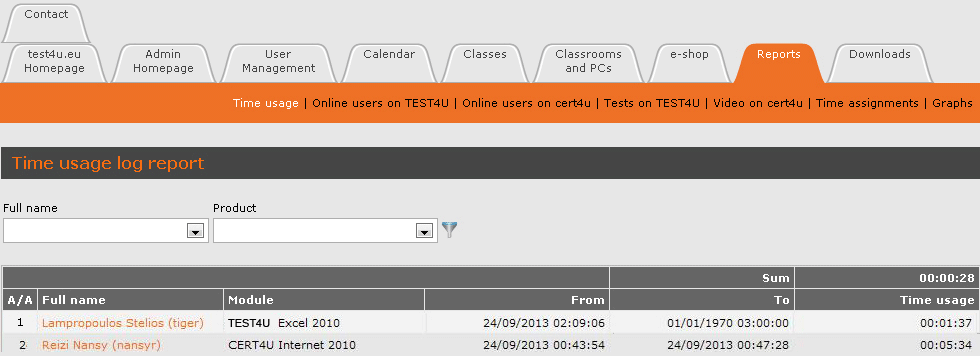
Moreover, it is possible to filter the results by student or product by using the appropriate boxes right above the time usage table and then clicking the filter button .
.The Tests on TEST4U link…

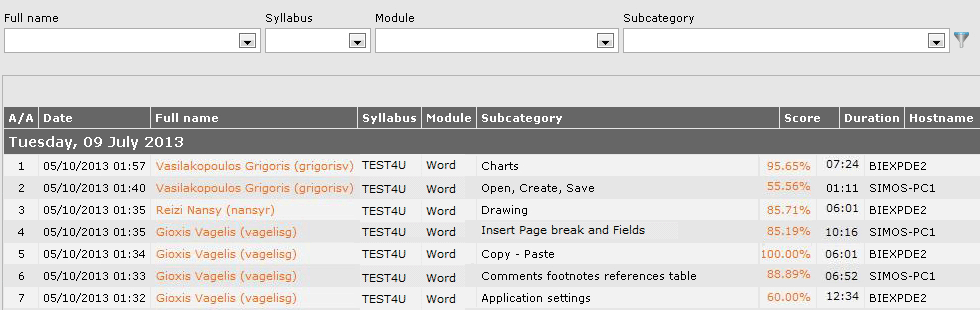
It is also possible to filter the results by name, unit, Certification Body or subcategory by using the appropriate boxes right above the table. All you have to do is to select a filter from the respective list and click the filter button.
.If you select the Time assignments link…
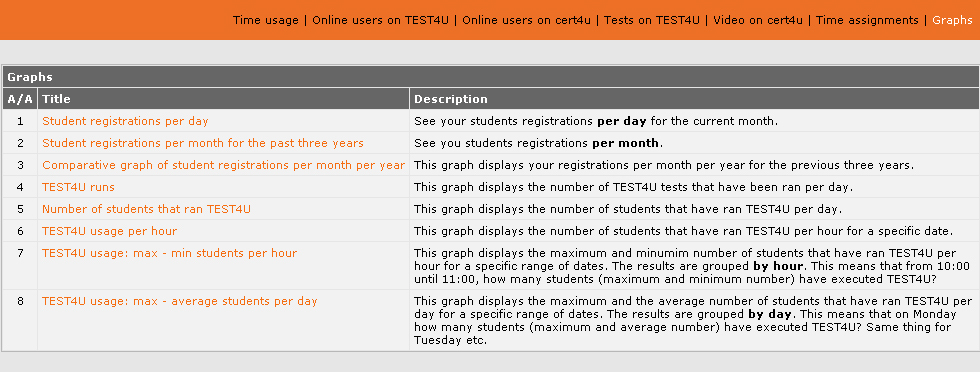
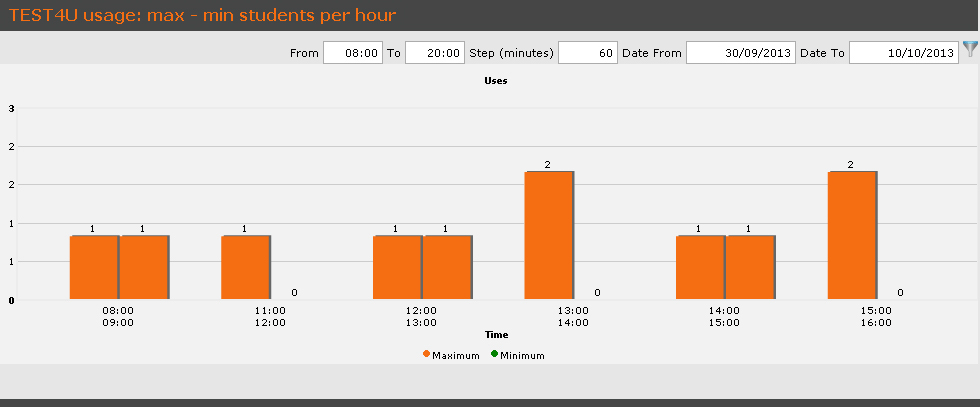
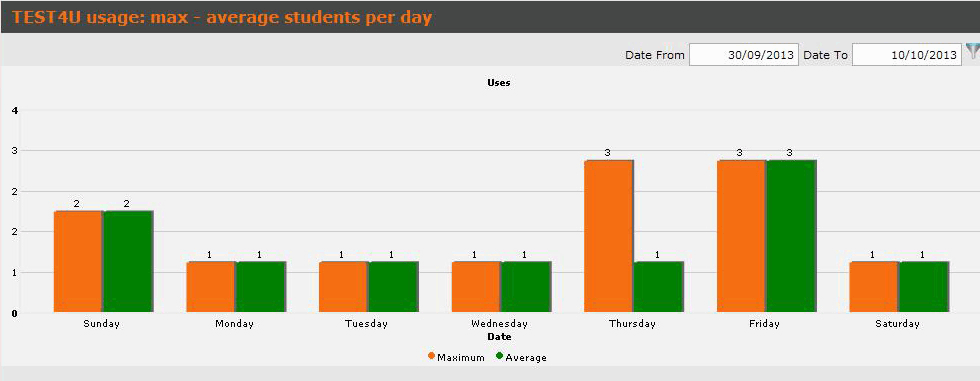
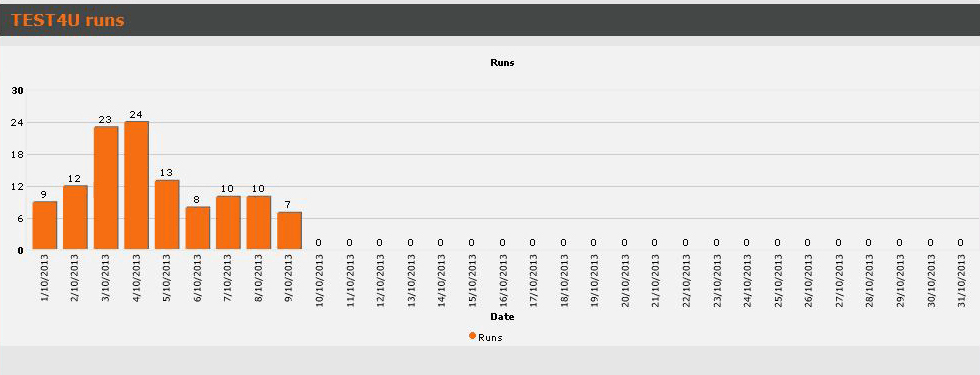
Charts
In conclusion, if you select the Charts link…